Convert Website Into An Android App | #10 Set Up Push Notifications
हम अपने Application से Push Notification भेजना चाहते है तो इसके लिए Firebase के Google Cloud Messaging Product का Use करेंगे।
तो इसके लिए सबसे पहले आपको Firebase में sign in या फिर अपना account बनाना पड़ेगा आप अपना Google Account का Use करके आसानी से बना सकते है
1. Account बनने के बाद आपको Get Started में Click करना है-
2. फिर आपको Add Project में चले जाना है-
3. फिर अपने Project का नाम डालिये उसके बाद Continue में Click कीजिये-
4. फिर से आपको Continue में Click करना है -
5. फिर हो सकता है आपके में Country select करने का option आएगा तो कर लीजिये मेरे में नहीं आया है उसके बाद Firebase account select करने का option मिलेगा उसको select करके Create project में Click कीजिये।
8. फिर आपको निचे दिखाए गए Option से File को Download कर लेना है फिर Next पर Click कीजिये-
9. उसके बाद आपको Android Studio में जाना है फिर निचे Image में दिखाए अनुसार Dropdown में से Project को Select करना है-
10. फिर आपको अपने Package name को Open करना है उसके बाद App में Mouse को लेजाकर Right click करना है उसके बाद Show In explorer में चले जाना है-
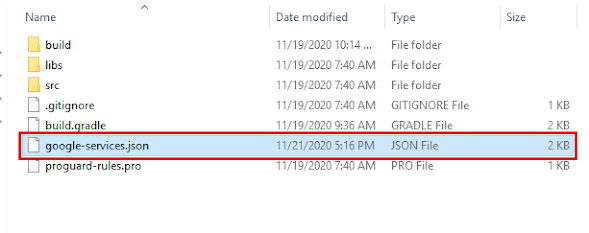
11. फिर आपको App folder के अंदर जाना है और जो File Firebase से download किये थे उसको App folder के अंदर Paste कर देना है-
12. अब आप file explorer को close कर सकते है
implementation platform('com.google.firebase:firebase-bom:26.1.0')
implementation 'com.google.firebase:firebase-analytics'
implementation 'com.google.firebase:firebase-messaging:21.0.0'
apply plugin: 'com.google.gms.google-services'
उसके बाद आपको MyFirebaseMessagingService नाम से java Class create करना है, फिर Enter में Click करना है-
import android.app.NotificationManager;
import android.app.PendingIntent;
import android.content.Context;
import android.content.Intent;

import androidx.core.app.NotificationCompat;
import androidx.localbroadcastmanager.content.LocalBroadcastManager;

import com.google.firebase.messaging.FirebaseMessagingService;
import com.google.firebase.messaging.RemoteMessage;

public class MyFirebaseMessagingService extends FirebaseMessagingService {
    @Override
    public void onMessageReceived(RemoteMessage remoteMessage) {
        Intent intent = new Intent(this, MainActivity.class);

        intent.setFlags(Intent.FLAG_ACTIVITY_CLEAR_TOP);
        PendingIntent pendingIntent = PendingIntent.getActivity(this,0,intent,PendingIntent.FLAG_ONE_SHOT);
        NotificationCompat.Builder notificationBuilder = new NotificationCompat.Builder(this);
        notificationBuilder.setContentTitle("FCM NOTIFICATION");
        notificationBuilder.setContentText(remoteMessage.getNotification().getBody());
        notificationBuilder.setAutoCancel(true);
        notificationBuilder.setSmallIcon(R.mipmap.ic_launcher);
        notificationBuilder.setContentIntent(pendingIntent);
        NotificationManager notificationManager = (NotificationManager) getSystemService(Context.NOTIFICATION_SERVICE);
        notificationManager.notify(0,notificationBuilder.build());

        //Change URL section
        String url = remoteMessage.getData().get("url"); //url is the key to be used in firebase for data
        intent.putExtra("url",url);
        LocalBroadcastManager localBroadcastManager = LocalBroadcastManager.getInstance(this);
        localBroadcastManager.sendBroadcast(intent);

    }
}
import android.util.Log;

import com.google.firebase.iid.FirebaseInstanceId;
import com.google.firebase.iid.FirebaseInstanceIdService;

public class MyFireBaseInstanceIDService extends FirebaseInstanceIdService {

    private static final String REG_TOKEN = "REG_TOKEN";
    @Override
    public void onTokenRefresh() {
        String recent_token = FirebaseInstanceId.getInstance().getToken();

        Log.d(REG_TOKEN,recent_token);
    }
}
<service android:name=".MyFireBaseInstanceIDService">
    <intent-filter>
        <action android:name="com.google.firebase.INSTANCE_ID_EVENT"></action>
    </intent-filter>
</service>
<service android:name=".MyFirebaseMessagingService">
    <intent-filter>
        <action android:name="com.google.firebase.MESSAGING_EVENT"></action>
    </intent-filter>
</service>
FirebaseMessaging.getInstance().subscribeToTopic("notifications");


hello
ReplyDeletemy FirebaseInstanceIdService is getting depreciated is there any solution to fix it please tell the solution. By the way your content is amazng.
same error
DeleteAny Solution
Push notifications are not working..
ReplyDeleteHello FirebaseInstanceIdService is depreciated is there any way to fix this? Thank you so much for your videos.
ReplyDeleteI really love your videos it helped me a lot. My only problem is that the FirebaseInstanceIdService is depreciated how to fix this?
ReplyDeleteHi.......
ReplyDeleteI have very important problem.....in my MyFireBaseInstanceIDService ,,, Suggestions to create classes...
Can you help me ?
Same problem any Solution
Deletepublic class MyFirebaseMessagingService extends FirebaseMessagingService {
Delete@Override
public void onNewToken(String s) {
super.onNewToken(s);
Log.e("NEW_TOKEN",s);
}
@Override
public void onMessageReceived(RemoteMessage remoteMessage) {
super.onMessageReceived(remoteMessage);
}
}
Replace the code in MyFirebaseMessagingService
Remove MyFireBaseInstanceIDService
tried the steps mentioned above but getting below error :-
ReplyDelete> Manifest merger failed with multiple errors, see logs
Task :app:processDebugMainManifest FAILED
F:\AndroidCode\WebView-Demo-master\app\src\main\AndroidManifest.xml:27:8-32:19 Error:
android:exported needs to be explicitly specified for element . Apps targeting Android 12 and higher are required to specify an explicit value for `android:exported` when the corresponding component has an intent filter defined. See https://developer.android.com/guide/topics/manifest/activity-element#exported for details.
F:\AndroidCode\WebView-Demo-master\app\src\main\AndroidManifest.xml:33:9-37:19 Error:
android:exported needs to be explicitly specified for element . Apps targeting Android 12 and higher are required to specify an explicit value for `android:exported` when the corresponding component has an intent filter defined. See https://developer.android.com/guide/topics/manifest/activity-element#exported for details.
See http://g.co/androidstudio/manifest-merger for more information about the manifest merger.
Thanks a lot brother for your help.
ReplyDeleteI have 2 issues with the APP.
1. The external links don't open. If there is ZOOM, Whatsapp or other link, it shows error.
2. The welcome splash screen process created error in Manifest.
How to fix it? I can pay you for it. Please resolve this. Please contact me @ 6359955995